Wednesday 8 December 2010

[Mike] - Presenting to Elli

Today we undertook the task of presenting our ideas and animation for the Visit Essex project to0 Elli Constantatou. Along with Richard Barnes and Jo Bowman, Elli was able to view all of the group's presentations for the project and give us some feedback on them.

Unfortunately due to illness, Simon Mills was unable to be present for the presentation so Michael, Daniel and Tom showed the video animation to the audience. A small Powerpoint presentation was created to give the audience some visuals whilst we were discussing the ideas and process to creating the animation.

We all felt that the presentation went really well. We tried to create a fun animation that would create a good vibe for the audience and it certainly did that with everybody enjoying themselves and finding parts of the animation very amusing.

After all of the presentations were completed, Elli, Jo and Richard were able to give us some feedback about what they thought were good and bad about our animations. This feedback would be beneficial to us when needing to create a project for a client in the future.

The feedback we received was very good. There were only 2 points that could be improved on by us. These were only very minor points and were more in the way of making our animation more suitable for the company to promote when only having a small amount of time for a video. We are going to make these minor changes before the final hand-in on Friday as they will only take a very small amount of time to complete. Elli, Jo and Richard all picked up on the idea of creating a good vibe for the audience and the animation having some humour involved. This was one of the things that we really wanted to get across so when we were given this feedback we were very happy.

Conclusion

Overall, I enjoyed this project and am very happy with the finished project. I enjoy working as a group because I work better in a team when I am able to bounce ideas off of people. It also allows me to take the overall project and work on small pieces of it with other group members. I feel that this is effective because other group members may think of ideas that I wouldn’t have thought about.

The group that I worked in was very good and we worked well together to complete an animation that suited the brief that had been given to us at the start of the project. After coming to a group decision as to how we were going to create the animation and the transitions between the scenes. I feel that I worked very well with both Dan and Tom with the transitions between my scene and theirs.

Overall the group worked very well and we produced some top quality work that impressed many of the other groups, Elli and the extras. There were a few issues that cropped up towards the end of the project however I felt we, as a group, were able to overcome this.

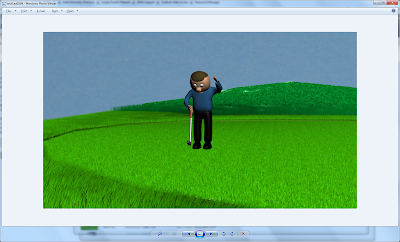
I decided to create a golf animation for a couple of reasons. Firstly I have a very keen interest in the sport and felt that this would be able to assist me in the creation of the idea for the scene. I also thought that it would be quite a test of my skills that I currently had in 3ds Max whilst also allowing me to learn new skills that I could use in the future. After deciding as a group what kind of theme we were going to go for and what character styles we were going to include, it was important to continue this theme throughout the animation.

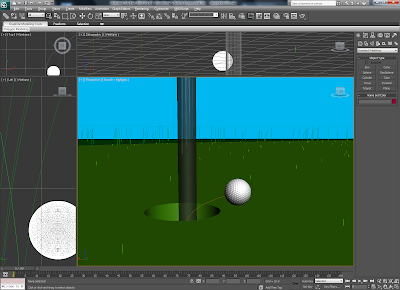
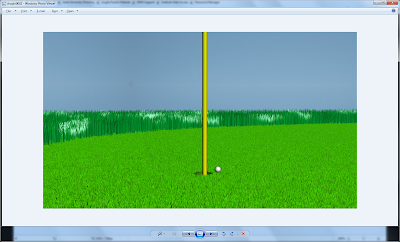
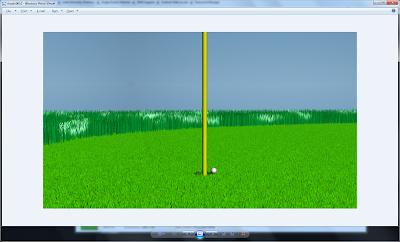
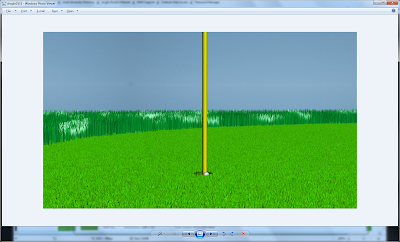
I was very happy with my part of our animation and felt that the detail in the smaller details, such as the grass and golf ball, made the scene look very realistic. If I had more time to work on the scene, I would have liked to have created the rest of the golf hole and maybe another separate hole just to allow a range of golf shots to be animated. The main problem that would come from increasing the amount of grass and size of the scene would be the render time. With the current animation it still took a long time to render however with more grass in the scene it would take even longer.

We decided at the beginning of the project that we would go for a Pixar-style animation, which decided how we were going to create the models. We felt that most of the groups would go for a more realistic feel in their video with very detailed and realistic models. We did want to be different and overall we felt that maybe ours was better in a lot of places. Part of me does wish that we had gone for a very realistic animations after seeing some of the amazing work others produced. I would like to continue using 3ds Max for my personal fun and experience in the future and feel that this project has only increased my confidence and abilities working in the program.

Throughout the project I was able to use skills that I had learnt in the previous 2 years in the program. This allowed me to gain confidence using particular parts of the program that are used very often in modelling and animation. I also have learnt many new skills in the program and new tricks that I would like to take forward with me. These include:

Path Constraints - creating a spline and attaching an object to it so that it follows this line in an animation.

Basic Maxscript - rather than messing with the UVW for the essex man that Dan created, I used the maxscript to disable the animation. This then meant that I could alter the colour of his clothes very easily. The maxscript I used was "selection.material = undefined"

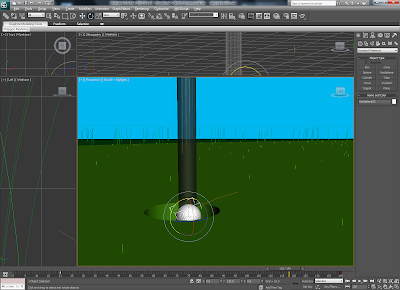
Hair and Fur Modifier - I had used this modifier before but not to the extent we I did in this project. I used it to create a range of different grass materials.

Producing the animation required a lot of working with the AutoKey, Keyframes, Cameras and Lights. I had used these in the previous module last year however I felt that I gained a lot more experience with them in this module. I now feel a lot more confident using them and am looking forward to using them again in future modules.


Rendering Problems

We have now worked with 3dS Max for 3 years on and off and there is one thing that has cropped up in each project that we have created. It is not only myself that has had this issue but it seems a recurring problem with all members of the class. This was the issue when it came to rendering our projects. It seems that no matter how well prepared you are, you can never prepare yourself for the issues that may occur when attempting to render the work.

In the previous projects I haven’t had too many problems when trying to render my work but there were a few problems in this project. Some of them were down to not concentrating and human error whereas others came down to issues with 3DS Max as a program.

The main issue I had was unfortunately when rendering 2 of my scenes (DropInHole + RollingBall) I had an issue with a big green line appearing across the top 3rd of the scene. There was no sensible reason for this and the only thing that I could think of was that the computers were struggling to render the high amount of Hair and Fur in the scene from the particular camera angle. After rendering it for the first time, I re-rendered it with the same settings and was unsuccessful in curing the problem.

I tried to de-bug the issue by taking some still images of the scene from different angles at different times to just see if I could find a solution. The only conclusion that I came to was that the scene would not render the hair and fur in the top 3rd from any camera angle. I came up with the idea that the only way to fix the issue would be by moving the camera angle lower so the top 3rd of the scene did not have any of the hair and fur modifier in. I then re-rendered the 2 scenes with a different camera angle without the top 3rd being used and they both worked without any green line.


A second issue I had, which wasted time was silly errors. On a couple of scenes both I and other group members completed renders that took a number of hours only to find 1 small issue randomly occurring in the middle of the scene. This could be a part of a model moving or maybe a change in colour causing an after affect on another object. We also had an issue with not concentrating and rendering from wrong camera angles but these were just down to human error so we were able to right these pretty quickly.

Transition

We decided as a group that we would have a transition sequence between each scene and try to make the scenes flow into each other without the audience really noticing a change in animator. Myself and Dan worked together to create the transition between our scenes using the Australian flag. I used the camera to zoom in on the flag so that it covered the full screen and faded into Dan’s image of the flag.

My Australian Flag


Dans Australian Flag

The other transition was going to be a lot harder to create. It was between Tom’s Lawnmower Race animation and moving into the start of my golfing animation. Thinking up how we wanted to do the transition was very simple and we decided this as soon as we sorted out the order of each person’s individual scene. At the end of Tom’s race, a golf ball was going to bounce in from the side of the screen and land on the racing track. The camera would then zoom in on the ball and eventually then move to my scene with the golfer ready to start his putt. We weren’t too sure how we were going to do this part of the transition.

I decided that I would import my scene into Tom’s and could then work on the transition. I placed my scene strategically at the end of the racing track where the golf ball landed. This would make it easier for the transition to take place between the race track and golfing green. We worked together on trying to get this transition to look realistic and take into consideration all of the parts of both our animations.

After Tom’s scene ended, we focussed the camera in onto the ball so that the background was of the racing track and only the ball in sight. After a short time of focussing in this way, the camera raises up and heads across to the golf green. We tried to position the camera to finish identically on top of where the next camera started for my scene but unfortunately we had some issues with the render sizes / aspect ratio’s and the camera angles. We were pretty close with where it ended up so were pretty happy with the outcome.


The only issue we found with the Transition between our scenes was that because of the shape of our individual models, it became an issue trying to angle the camera so that it focussed on the parts of the scene that existed and not the skybox that was created as the background. Unfortunately you do realise that obviously the golf green was created rather than a whole golf course but this could not be helped.

Scene 5 – Celebration + Transition

The final scene of the animation is the golfer celebrating the fact that he has made the winning putt after it had previously stopped on the edge of the cup before just rolling in. I wanted to have a similar scene to the one where he was upset and disappointed at not making the putt to show the comparison between his two reactions.

I decided it would be quite fun for the golfer to throw the golf club into the air in celebration of achieving his goal of making the important putt. To do this I had to detach the club from the biped, which I had set up previously to make it more realistic when moving the hands. Once I had done this I created an animation of the golfer throwing his hand up into the air. I moved the golf club alongside the hand to show that he still had hold of it until the release of it. The release was important because I wanted to make it look natural. The first attempt I made had the golf club coming out of the hand way too early and did not look correct.

Golf Club Release


Now the golfer had let go of the club, I was able to create the animation of the golf club spinning and falling to the ground as it would do in real life because of gravity. I did this by using the rotation and movement tool and manipulating the object in the different keyframes to create the animation.

Golf Club Spinning


I also animated the other hand of the golfer to show him celebrating. I made him lift his hand in celebration and pump his fist whilst the club is floating around in the air on its way to the ground. I decided to also animate the crowd as in a professional golf tournament the crowd cheer for the golfer who wins the tournament. To do this I created an animation on one of the models in the stands of them standing up and raising their hands in the air in the form of a celebration. I then repeated this animation for all of the bipeds/characters sitting in the stands so that they all cheered when the putt was made.

Crowd standing up


The final part of this scene was going to be the transition to the next scene of our animation. As a group we had discussed the possible ways of moving between the scenes. We split up the transitions between the group so that each person would focus on one transition whilst working with the group member who it would also affect.

I discussed with Dan how we were going to connect our two scenes together. After seeing his work, which included a range of barrels with flags on representing the different national beers, I decided that a good way of transitioning between the two would be to include some flags into my scene. I was happy to do this because I had already considered adding some national flags onto the stand as this is used in real life to show the range of nationalities of the golfers playing in the tournament.

My flag


Dan's flag

I decided that the best way to link the flags would be to zoom in on the flag very close and then Dan would be able to fade between the background of the 2 flags. To achieve this at the end of the animation of the golfer throwing his club in the air and cheering, the camera zooms in towards the set of flags in the stand. I decided to zoom into the middle flag (Australian Flag) because it is the middle barrel in Dan’s scene. This would then allow him to zoom out from the barrel and for it to look more effective.

Zoom in to Flag


Final zoom position

Scene 4 – Drop In Hole

The most watched and most amazing golf videos are those that create a huge amount of anticipation with the final result being a success. A good example of this is when a golfer has made a putt in the same way that myne has in the animation only to have it finish on the lip of the hole. Sometimes, maybe its fate or maybe its pure luck, the ball takes an unrealistic turn and falls into the hole. After having the golfer disappointed with the result of the golf shot, I wanted him to have this experience of the golf ball falling in.To achieve this, I used the final position that the golf ball finished in after being hit where the ball was sitting on the lip of the golf hole.

I decided that I would have a second attempt at using the “Path Constraint” method that I had discovered earlier in the project because I felt that it was interesting and an effective result could be achieved. The problem I had earlier was that I was struggling to find a way to change the speed at different points within the rolling sequence. This was not going to be in issue here because I was happy for the ball to travel at a very slow but consistent speed.

I created a line with a bend in it so it was in the shape of a right angle but with a soft edge. This allowed me to move and rotate the line so that it ended up in the hole. This would create the effect of the ball rolling into the hole.

Path Constraint Line

I added the Path Constraint Line to the ball so that it would follow the line in the animation. 3DS max automatically sets the length of the animation to the full length of the timeline. I then moved the keyframes to the desired length of the scene so that I could determine and adjust the speed of the ball. The easiest way I did this was by doing a test render to see how fast the ball rolled into the hole and whether it was realistic or not.

I used a similar method to what I used earlier with the rotating of the ball. To make a more realistic motion of the ball rolling in, I added some rotation in the final keyframe of the animation so that as the ball followed the path of motion it also rotated as if it was rolling into the hole.

Ball Rotation

Scene 3 – Golfer Upset

The previous scene finished with the ball resting on the lip of the hole. This meant that the golfer had not made his shot and would be upset about missing it. I was trying to create the idea that it was a very important putt with all of the people sitting and standing watching the golfer make his putt.

This scene starts by focussing on the golfer and not looking at the ball at all. The camera doesn’t move so that the viewer focuses on the reactions of the golfer and how upset he is at missing his putt. The idea of leaving the golf ball finishing on the edge of the hole meant that it was very unlucky for the golfer, which may spark a reaction like the 1 I have shown in the animation.

This scene required me to make an animation using the hands and arms of the golfer to create the feeling of sadness or anger at missing his putt. To do this I moved the bones of the Biped so that he placed his hands on his head in despair. I had to make sure that there was no pinching or unrealistic movements of the skin and clothes on the golfer.

I also used the rotate tool to create the idea of the Golfer shaking his head in disappointed. This was simple to do because I used the “Autokey” function and just rotated the head in the second keyframe. The animation then is created and I watched it back to check the result to see that he was shaking his head.


I enjoyed making this scene because it included some humour whilst also still looking realistic. I think that from the reaction I have already seen from people who have viewed this scene, it may be regarded as one of the most enjoyable scenes.

Scene 2 – Rolling Ball

After we had decided what small animation each group member would do, we thought about what would be included in each scene. The first thought that came into my head when considering doing a Golf scene was inspired by the Golfing computer game “Tiger Woods PGA Tour” Series. As a gamer and golfer, I have a keen interest in these types of games and have experienced playing them and the different motions it has in it.

When putting the ball on the green, after the ball makes contact with the club, the camera zooms in and focuses behind the ball. This is to give the impression of getting a “Ball Cam” or what is happening from the point of view of the ball. This is very effective because it increases the anticipation for the player because they feel involved as if they were the ball. I wanted to create this form of animation in my scene because I feel that it is very effective.

The 2 issues that I was going to have with this scene was going to be quality of modelling. The camera would be focussed in solely on the golf ball and watching it roll to the hole. This meant that people would be looking at the golf ball and the grass it was rolling on. This therefore made it very important that the quality of the Golf Ball and the Green was incredibly important.

Golf Ball+green


Once I had put the models of the grass and the golf ball together, the rest of the scene was then focussed on ensuring the camera was positioned correctly behind the ball. I tried one method of doing this using Path Constraints but was un-able to get the desired animation so had to find a separate way.

As mentioned, the first method I tried to use was with “Path Constraints”. This allows you to create a spline and then have an object follow it in an animation. I created a line with a slight bend in it to create a more realistic look for the golf ball. I then selected the golf ball and added a “Path Constraint” to it and selected the line. I have never used this method before and overall am very impressed with the possible outcomes that could be achieved however it would need a lot of time to be spent looking through all the options.

Ball on spline

The reason I had to change method was because even though the spline worked fine and the animation ran with no problems, I was unable to change the speed that the ball would travel in different places. The only way I thought that this would be possible would be to add multiple lines one after the other and would have more flexibility with the keyframes.

I decided to change my method and go for the method that I had originally considered, which is something I have used before. I used the “Autokey” function to create my key frames and split up my timeline into sections for different parts of the rolling sequence. I started off with a small section between the first 2 keyframes and increased the size for the next 2 and the final 2. This would mean that the ball would start off travelling at a high speed and gradually slow down just like a golf ball in real life would do

The final part of the animation I needed to do was to implement a form of roll on the golf ball. At this stage I had the ball moving towards the hole at the correct speeds and in the right direction however I did no have any roll on the ball. This meant that the animation did not look natural because it looked as if the ball was just floating across the surface.

I originally struggled to think of a way that this could be done but eventually came to a solution, which turned out to be very simple in hindsight. All I needed to do was, with the “Autokey” function on, use the rotate function on the ball at the keyframes. This then meant that the ball would complete the amount of rotations I desired in between each set of keyframes. I could also make it so that as the ball slowed down, it rotated less. This also added to the realism of the motion.

Rotation on ball


The Golf Ball finishes this scene sitting on the Lip (edge) of the hole, which will upset the golfer because he had the hopes of it going in.